Thursday, July 30, 2015

Ukulele Acessories

There's not much extra needed, besides a uke, to play a ukulele but I do think that by adding a custom strap made by Sarah Maisel to my new tenor has made the instrument sound and look even more beautiful!


Sarah's 'rubba slippa' design suits this instrument perfectly. 

Many players prefer to play their ukulele strapless but I find that with the instrument supported by a strap rather than my left hand and right arm I am less encumbered when playing.  If you haven't tried a strap on your uke you should consider experimenting with one some time. 


Tuesday, July 28, 2015

Itsy Bitsy Ukulele

Yesterday I received a small package in the mail. It was a ukulele. Specifically it was an Itsy Bitsy uke handcrafted by Allan Page in England. 


The uke has a mahogany body, cedar neck, rosewood fretboard and lovely details like the inlaid heart design in the head stock. Having just completed my own ukulele build I am all the more appreciative of the quality of the craftsmanship evident in this instrument. 

The uke is, well, itsy bitsy. Here it is next to my soprano:


I'll be spending some time playing this teeny uke and getting feedback from other ukulele players after I get the uke into their hands. Stay tuned for more blog posts about this robust little uke. 


Friday, July 24, 2015

Hana Lima 'Ia - final day

We certainly packed a lot in during this two week course.  Yet, you'd never know it was our last day if you saw us working today. Cleaning up the fingerboard, installing the tuners, drilling the final two holes on the bridge, adding the saddle, putting strings on the uke, checking the action, and listening for any buzzing. There was a lot to do before we could honestly just sit back savouring our handiwork. 

Here are the tuners waiting to jump into the headstock:


Check!


Fingerboard is smoothed and oiled again and then it's time to finish the bridge:


As we start to string up we need to make a few minor adjustments to the saddle and then sand down the nut to lower our action. 

Finally the ukes are tuned, no buzzing - yay!  And it's graduation time!


Thursday, July 23, 2015

Hana Lima 'Ia - day nine

Big work day at the wood shop today!
Getting so close to finishing our instruments but, e-gads, still so many details!

We spend the first couple hours sanding...100 grit is our normal sanding paper but we go up and up from there...


And finally our ukes are smooth enough to be ready to take on a full coat of tru oil. 


And the finish is a big reward for us!


Here's our babies hanging to dry:


Every detail that we worked so hard on is starting to add up to create handsome ukuleles. 


After lunch there's no rest for the weary, we cut the string notches in the nut and we start to mount the bridge. 


It involves lots of precision. 


Finally it is clamped into place. 


The next big treat will be hearing how the instruments sound when we string them up. But that will be tomorrow's surprise. However, the workday wasn't quite over for me. Earlier when we had carefully fashioned the tracks for our strings to lie in in the nut I was a bit off on my "G" string notch which cost me an extra  hour as I had to build another nut from scratch. No accurate nut = no accurate strings. 

A tough lesson but I learned a lot from making that second nut which I'm sure will serve me well in the future given the  huge impact the nut has on the fine tuning of ukuleles. 

It was my longest work day yet but I felt a huge sense of satisfaction as I chugged back to the hostel on the trusty bus #42. 


Wednesday, July 22, 2015

Hana Lima 'Ia - day eight

We're getting close to finishing our ukes, Mike assures us, but still there's a ton of work for us to do today. 

I recently read a luthier's statement where he said the to make a ukulele involves more than 100 steps... now I believe it!

First we measured, marked and then drilled the tuner mounting holes. 


This is my pal Stan's headstock, similar shape to mine but with a black walnut veneer to match the wood on the back and sides of his uke. 


Here's Werner's headstock with its attractive rounded shape. 


We move on to work on sizing and shaping our nut and saddle. These two critical pieces gave me some grief as my lack of precision sanding skill brought down some wrath from our instructor. I sucked in my pride and consoled myself by realizing that I had the instrument almost built now so if I screwed up in these final steps I could certainly seek the help of local luthier friends when I returned home. Boosted by this back up plan I humbly dragged myself along. 

Here's the two small troublesome bits, the chunks of white material: 


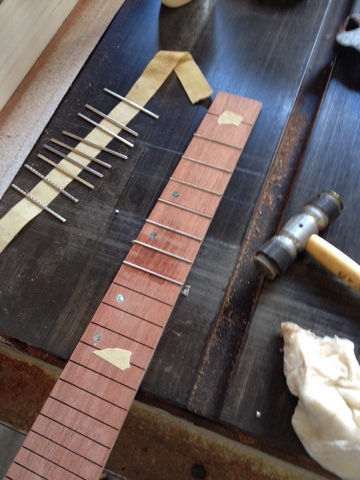
Next we turned our attention to dressing the frets which is a process I had been curious about. Lucky for me I had good success with this step!

We marked to top of each each fret with a felt pen then used a simple flat edge to check for unevenness. Hurray, mine were already fairly even! Thanks gawd for doing something correctly! Then we took a special tool and crowned each fret after which we sanded the edges followed by polishing each one .  And finally, we scraped between the fretwire with a razor blade's edge. Three diiferent coarseness pads served to smooth sand the entire fretboard.  


To finish off the fretboard, we applied fretboard oil, similar to mineral oil, to the fingerboard. Mike reminded us that we could do this every 6 months or so when we change the uke's strings. 


The last task of the day was to practice applying tru oil which we will actually sand off tomorrow so we can sand with even finer grits and the apply the actual final coat of oil.  Looks pretty good at this point I think with an overwhelming feeling of relief!


Tuesday, July 21, 2015

Hana Lima 'I a - day seven

Honestly this is the point where I start to worry about whether the uke will turn out playable. So many steps in this process, so many places to make a minor mistake in measuring or slightly miss a mark when clamping or not sand one area enough. I worry as we head into the final few days: will the uke look ok or will she be a botch job?  Will she sound ok? Will it feel good to hold and play? So many hours invested, so many opportunities for a rookie in the wood shop to make little errors that end up producing a poor result!

Nervously, I move into day seven...

...and Mike saves my bacon!  

Mike doesn't like a student to fail. So he fills the gap between my lack of woodworking skill and my enthusiasm for this building process. Just as I think my worst fears will be realized when Mike says we'll be shaping the squared off timber into a uke neck he reaches for my uke and uses it to demo the process. By doing this he sets me up well along the way to shaping a desirable ukulele neck. I am soooo grateful and relieved. 

This is the day when I realize I am actually over my head here but Mike says 'you're not gonna learn if you're doing stuff you already know how to do!"

Here's Mike cutting the neck to our fretboard width for us. 


This is how the uke looks after the neck trimming:


Then Mike grabs a giant cheese grater rasp and has at the neck taking off the edges and showing us the steps necessary to shape it into a comfortable neck. 


The neck is emerging:


I'm so pumped that we are at this stage that I am able to levitate my uke!


We interrupt the work on the neck to finish the heel cap and to cut out our headstock shape. Another nerve wracking process but again Mike holds my hand and a relatively attractive headstock starts to surface. 


For the rest of the day we rasp, file, sand, fill and sand and sand and sand....100 grit, 120, 180, then we wet the wood to raise the fibres, let it dry and....sand again, this time 220. 

Tomorrow we will...wait for it...sand some more!  But for now, here how she's looking:


Monday, July 20, 2015

Hana Lima 'Ia - day six

With the rhythms of Willie K, Jake and many others from the festival still buzzing in our heads, we launched into the second week of our ukulele course. 

Mike declared that all of us had been too conservative when it came to sanding our soundboards.  He wants them thinner for more resonance and a lower tone. So we start sanding. 

Before we're actually at that place of an intimidatingly thin soundboard we switch to working on our headstock veneers. I inlay the abalone that Chuck Moore of Moore Betha ukuleles sent to me as a gift. As I drop in the pieces I dream that just a little bit of Chuck's amazing uke making and inlay art mojo gets carried over into my new instrument. 


Now it's time to add the marker dots to our fretboards. I love the abalone circles Mike gives us and enjoy drilling the holes in which the markers will be placed. I chose to offset my fret markers based on similar designs on a few different ukes I have seen recently. 


Next it's time to learn how to cut and install fretwire into our fingerboards. Mike shows us how and we get to work. 


We attach the head plate to the headstock, attach the fingerboard to the neck and add tons of clamps then we call it a day!


Sunday, July 19, 2015

45th Annual Ukulele Festival - Hawaii

Sooooo excited to have the privilege to be on Oahu for the festival! What a fantastic vibe as Kapiolani park transformed into a ukulele player's dream! 


I arrived early to find lots of folks setting up: tempting food vendors, ukulele companies, Kamaka, Koaloha, Kanile'a, Kala, families putting up shade tents, folding chairs and even a few inflated air mattresses. The auntie I sat next to, on the benches in front of the bandstand, doesn't play the ukulele but she comes to this festival every year. 

I score a unique uke themed gift for my sweetie. Well, I won't be posting a photo of that now, will I!?

Those who know me well know that I would naturally buy a festival tee shirt but in this case it needed to a purple one as per the directions of Roy and Nelly who have organized the Strummer's group which I have the honour of being a part of. 


Everywhere ukuleles, people walking by carrying their ukes, ukes in cases, ukes in stands, ukes on stage, ukes resting in the shade of huge silk trees. Am I dreaming?! How can there we so many jumping fleas in one location?!


And performers...  good groups and good soloists one after another!
The Langley  Ensemble totally ripped it up!


And did I mention, this festival is free! All the performers perform for free. Aloha abounds as the ukulele infuses everyone's attitude. The organization is smooth and relaxed; performers and audience alike all having a grand day in the park together like one ohana. Not once all day did I hear anyone say 'U'kelele.  This is the birthplace of the ukulele after all so it only makes sense that it would be pronounced 'ookeleke'. 


Kids, keiki, heaps of kids played ukulele at the festival. 


The Strummers Group was comprised of over 100 of us!  We played two songs on stage with Willie K throwing some improv into the mix.  Here we are with Willie K heading us up!


Here we are 'live':  https://m.youtube.com/watch?v=xvZXktKZV7I

And you might even be able to spot me in this closer group photo:


What a ton of fun that was! We each received a participation medal as recognition of our contribution to the festival. 


And just when I thought it couldn't get any better, Jake Shimabukuro shows up on stage! The absolute best icing on the most fabulous ukulele cake ever!